Automating Terraform with Gitlab CI
In this guide, I am setting up a small Git repo in Gitlab with a CICD pipeline to manage cloud infrastructure using Terraform. In this guide, I am focusing on AWS, but it is possible to use the same build pipeline with other supported cloud providers as well.
Git repository⌗
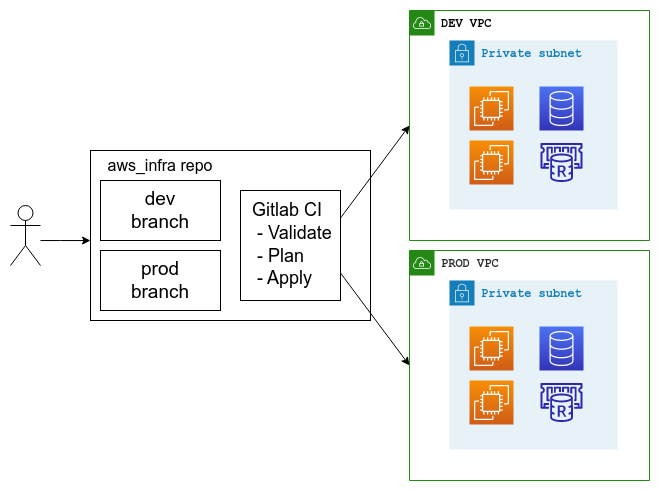
The git repository for the cloud infrastructure is set up with two main branches: dev and prod. Both branches are marked as protected in Gitlab. So they can use the protected AWS/Azure/GCP credentials. The prod branch is protected; only maintainers can commit/merge. And the dev branch is opened to developers to commit/merge and test before pushing/merging into prod infrastructure.
In this instance, I am using AWS. But this applies to all supported Terraform providers.
├── backend.tf
├── dev.tfvars
├── main.tf
├── modules
│   └── ec2
│       ├── main.tf
│       ├── outputs.tf
│       └── variables.tf
├── prod.tfvars
├── provider.tf
└── variables.tf
I have set up a S3 backend to handle the terraform state files. I am using dev.tfvars and prod.tfvars to handle different variables in each branch. Other terraform files are self-explanatory.
Cloud credentials⌗
Next step would be creating a new user with enough permission to create, modify, and destroy the infrastructure you’re planning to build. Usual security and access policies and good practices should be followed here. And only required minimum permissions should be given. That way it is easy to control what infrastructure does not get affected by terraform.
In the gitlab repository variable section, put the access keys and such as protected and masked variables. I am using AWS in this case, so for me these would be: AWS_ACCESS_KEY_ID, AWS_SECRET_ACCESS_KEY, AWS_DEFAULT_REGION. And if the dev and prod (or any other enviorenments) are deployed on different AWS accounts, you can use the variables in such a way to set up access to all accounts. And modify which keys/IDs are being used based on the scenario in the .gitlab-ci.yml file.
Pipeline design⌗
As you might know, there are two major steps when you deploy your changes through terraform; plan and apply. So in our pipeline, we need those two steps. However, since this is going to be an automated process, we have to add some more steps. Specially the validate step. We need to validate the changes we pushed to the repository before we deploy. The terraform validate command let us do a basic validation on the terraform files we are about to execute.
Validate   ->    Plan    ->    Apply
                  │              │
                  └── out file ──┘
I’m not putting the destroy step here, but if it is required in your use case, you can add it as well. This is a very simple design to highlight the use of Gitlab CI; you can expand or reduce as you needed.
gitlab-ci.yml file⌗
stages:
  - validate
  - plan
  - apply

image:
  name: hashicorp/terraform:light
  entrypoint:
    - '/usr/bin/env'
    - 'PATH=/usr/local/sbin:/usr/local/bin:/usr/sbin:/usr/bin:/sbin:/bin'

before_script:
  - export AWS_ACCESS_KEY=${AWS_ACCESS_KEY_ID}
  - export AWS_SECRET_ACCESS_KEY=${AWS_SECRET_ACCESS_KEY}
  - rm -rf .terraform
  - terraform --version
  - terraform init

validate:
  stage: validate
  script:
    - terraform validate

plan:
  stage: plan
  script:
    - terraform plan -out "tf_plan" -var-file $CI_COMMIT_BRANCH.tfvars
  dependencies:
    - validate
  artifacts:
    paths:
      - tf_plan
  rules:
    - if: $CI_COMMIT_BRANCH == "prod" || $CI_COMMIT_BRANCH == "dev"
      when: always

apply:
  stage: apply
  script:
    - rm -rf .terraform
    - terraform init
    - terraform apply -input=false "tf_plan"
  dependencies:
    - plan
  rules:
    - if: $CI_COMMIT_BRANCH == "prod" || $CI_COMMIT_BRANCH == "dev"
      when: manual
Let’s check out a breakdown of the .gitlab-ci.yml file.
image:
  name: hashicorp/terraform:light
  entrypoint:
    - '/usr/bin/env'
    - 'PATH=/usr/local/sbin:/usr/local/bin:/usr/sbin:/usr/bin:/sbin:/bin'
Here I have only used a single image for all stages. In this use case, we can only manage using the hashicorp/terraform image. But for any further processing, instead of a global image, this can be set as a per-stage image. YMMV.
before_script:
  - export AWS_ACCESS_KEY=${AWS_ACCESS_KEY_ID}
  - export AWS_SECRET_ACCESS_KEY=${AWS_SECRET_ACCESS_KEY}
  - rm -rf .terraform
  - terraform --version
  - terraform init
In the before script, I am setting up the AWS credentials as environment variables to be used with Terraform. Here I am using a single AWS account. But if you have multiple accounts, you can set up the variables based on the scenario.
For example, if dev and prod environments are in two separate accounts:
before_script:
  - |
    if [ $CI_COMMIT_BRANCH == 'dev' ]; then
      export AWS_ACCESS_KEY=${AWS_ACCESS_KEY_ID_DEV}
      ...
    else
      export AWS_ACCESS_KEY=${AWS_ACCESS_KEY_ID_PROD}
      ...
    fi
validate:
  stage: validate
  script:
    - terraform validate
This simply validates the terraform files in the repo.
plan:
  stage: plan
  script:
    - terraform plan -out "tf_plan" -var-file $CI_COMMIT_BRANCH.tfvars
  dependencies:
    - validate
  artifacts:
    paths:
      - tf_plan
  rules:
    - if: $CI_COMMIT_BRANCH == "prod" || $CI_COMMIT_BRANCH == "dev"
      when: always
In the planning stage, I have set up a rule to run the stage only when the branch is either dev or prod. This avoids any pipeline failures due to unsupported branches running the pipeline. And with the validate state set as a dependency, the stage will only run if the terraform files are validated. Also I am using the $CI_COMMIT_BRANCH predefined Gitlab variable to pick which variable file to be used when running the plan command. When it is prod, the command will use prod.tfvars and when it is dev the command will use the dev.tfvars file.
And it saves the out file as an artifact to be used in the apply stage.
apply:
  stage: apply
  script:
    - rm -rf .terraform
    - terraform init
    - terraform apply -input=false "tf_plan"
  dependencies:
    - plan
  rules:
    - if: $CI_COMMIT_BRANCH == "prod" || $CI_COMMIT_BRANCH == "dev"
      when: manual
And finally, in the Apply stage, again, I have set up a rule to run the stage only on dev and prod. It depends on the plan stage as it uses the out file to apply the changes. And as an addition, I have set it to run manually instead of always. Meaning that a user have to manually run the stage once all other stages are successfully completed. This gives a final layer of protection against accidental executions. But if you need to fully automate this, setting the when: always is sufficient.
Conclusion⌗
Gitlab CI provides an easy way of dealing with Terraform automation with their hosted or SaaS solution. And this should also work without any issues in thier free tier / community edition as well.
This is a very simple set up to demostrate how to use Terraform with Gitlab CI. But this can be extended into much more complex deployment pipelines as needed. For example, you can set it up to run the apply after a merge request. Or set up CODEOWNERS to further restrict access on prod.